Setting up environment for Stable Diffusion for image creation

Introduction
We all know that cool pictures created by AI tools like DALL-E, Midjourney, and so on. But they can also be generated locally without connecting to an external service with your own computer if a few requirements are met. This blog post will concentrate on installing the basic requirements and creating a first test image.
One note upfront: If you want fast results the easiest way to generate pictures is AUTOMATIC1111’s Stable Diffusion web UI most probably. But still this guide might help to meet the basic requirements to get it running. But I wanted to do it programmatically. So if you search for a nice UI this guide is not for you. Well, if you consider Visual Studio Code with Jupyter Notebook support a UI then it still might be for you 😉
Hardware requirements
The most important part most probably is a fast GPU and some GPU memory. The more the better of course. 8 GByte memory for the graphics card is recommended. With lower memory only smaller images can be generated. In my case it’s a NVIDIA RTX 4080 SUPER with 16 GByte. NVIDIA is generally recommended as it has best support. AMD GPU support is getting better but it’s still not there. Additionally at least 32 GByte of computer memory (RAM) makes a lot of sense. A fast CPU and a big and fast NVMe/SSD drive is too 😉
Install Ubuntu 24.04
First I installed Ubuntu 24.04. This of course depends on your environment and maybe Ubuntu is already installed on your PC.
Install NVIDIA drivers
After logging in lets check which NVIDIA drivers are available:
apt-cache search 'nvidia-driver-' | grep '^nvidia-driver-[[:digit:]]*' | sort -k 3 -t '-'The output will look similar to this (partial output):
...
nvidia-driver-535 - NVIDIA driver metapackage
nvidia-driver-535-open - NVIDIA driver (open kernel) metapackage
nvidia-driver-535-server - NVIDIA Server Driver metapackage
nvidia-driver-535-server-open - NVIDIA driver (open kernel) metapackage
nvidia-driver-550 - NVIDIA driver metapackage
nvidia-driver-550-open - NVIDIA driver (open kernel) metapackage
nvidia-driver-550-server - NVIDIA Server Driver metapackage
nvidia-driver-550-server-open - NVIDIA driver (open kernel) metapackage
How to install the drivers is written in detail in NVIDIA drivers installation. Here is the short version. The easiest way is to use ubuntu-drivers command. To get this lets install it:
sudo apt install ubuntu-drivers-commonThe next command lists which drivers are available for the GPU installed. For the NVIDIA RTX 4080 SUPER it’s currently only nvidia-driver-550. E.g.:
sudo ubuntu-drivers listThe list looks like this:
nvidia-driver-550-server-open, (kernel modules provided by nvidia-dkms-550-server-open)
nvidia-driver-550-server, (kernel modules provided by nvidia-dkms-550-server)
nvidia-driver-550-open, (kernel modules provided by nvidia-dkms-550-open)
nvidia-driver-550, (kernel modules provided by nvidia-dkms-550)
To automatically install the driver use this command:
sudo ubuntu-drivers installInstall NVIDIA CUDA Toolkit
Before installing NVIDIA CUDA Toolkit (a development environment for creating high-performance, GPU-accelerated applications) the GNU Compiler Collection needs to be installed:
sudo apt install gccNext install NVIDIA CUDA Toolkit:
sudo apt install nvidia-cuda-toolkitNow reboot the computer (to activate the GPU driver):
sudo rebootInstall NVIDIA utils
To check if the driver works as expected the nvidia-smi utility can be used. This needs the following package to be installed (the number matches the driver version):
sudo apt install nvidia-utils-550-serverIf that doesn’t work you can try to install the nvidia-utils-550 package:
sudo apt install nvidia-utils-550Running nvidia-smi should produce an output similar to this:
+-----------------------------------------------------------------------------------------+
| NVIDIA-SMI 550.90.07              Driver Version: 550.90.07      CUDA Version: 12.4     |
|-----------------------------------------+------------------------+----------------------+
| GPU  Name                 Persistence-M | Bus-Id          Disp.A | Volatile Uncorr. ECC |
| Fan  Temp   Perf          Pwr:Usage/Cap |           Memory-Usage | GPU-Util  Compute M. |
|                                         |                        |               MIG M. |
|=========================================+========================+======================|
|   0  NVIDIA GeForce RTX 4080 ...    Off |   00000000:08:00.0 Off |                  N/A |
|  0%   45C    P8             15W /  320W |    6455MiB /  16376MiB |      0%      Default |
|                                         |                        |                  N/A |
+-----------------------------------------+------------------------+----------------------+

+-----------------------------------------------------------------------------------------+
| Processes:                                                                              |
|  GPU   GI   CI        PID   Type   Process name                              GPU Memory |
|        ID   ID                                                               Usage      |
|=========================================================================================|
|    0   N/A  N/A      4143      C   /home/user/pytorch/bin/python                6448MiB |
+-----------------------------------------------------------------------------------------+
One interesting value is GPU Memory Usage (in the example above 6448MiB which is around about 6.2 GByte). While creating images later you can have a look at that value to see how much Video RAM is used during image creation. If you get above to the VRAM limit (16 GByte in my case) you might see “out of memory” errors. In this case a smaller model might be needed or the size of the generated needs to be reduced.
Install Python Virtual Environment
At this point you’re basically also setup to install AUTOMATIC1111’s Stable Diffusion web UI if you want. But even in this case a Python Virtual Environment might make sense. This is extremely useful to not mess with the Python packages that are installed by the system. So you can create a venv basically for every experiment you make and if that one is no longer needed just delete the whole directory and everything is gone. To install Python venv use this command:
sudo apt install python3-virtualenvCreate Python venv for Stable Diffusion
Lets create a Python venv for Stable Diffusion. The target directory should have at least 10 GByte free space for the first experiments. But at the end it could be much more the more models you download e.g. So again: More is better 😉
python -m virtualenv stablediffusionThis will create a directory called stablediffusion. Lets cd stablediffusion. Then the Python venv needs to be activated:
source bin/activateThis will change the location of your Python interpreter. which python can be used to check if the python command of the venv is used. The result should be similar to <home_of_venv_directory>/bin/python.
Install PyTorch
Hugging Face Diffusers library depends on PyTorch. So lets download and install that one. PyTorch is available in various versions. ROCm is for AMD GPU users e.g. There is also one if you only want to use the CPU (that’s normally very slow). And currently there is a version for CUDA 11.8 and CUDA 12.1. As I’ve a NVIDIA GPU I need the CUDA variant. Also I’ll install PyTorch via pip (the Python package manager). Lets check which CUDA version is installed. This is needed to select the correct PyTorch variant:
nvcc --versionThe output will be similar to this:
nvcc: NVIDIA (R) Cuda compiler driver
Copyright (c) 2005-2023 NVIDIA Corporation
Built on Fri_Jan__6_16:45:21_PST_2023
Cuda compilation tools, release 12.0, V12.0.140
Build cuda_12.0.r12.0/compiler.32267302_0
In the case above it’s CUDA 12. That does not completely match what’s available for PyTorch. Instead of CUDA 12.0 I’ll choose CUDA 12.1 in the next step. With all the information lets open PyTorch’s Start locally page. Select
PyTorch Build:StableYour OS:LinuxPackage:PipLanguage:PythonCompute Platform::CUDA 12.1
If done the value of Run this Command: will be:
pip3 install torch torchvision torchaudio --index-url https://download.pytorch.org/whl/cu121Running a Stable Diffusion pipeline
Lets execute the following commands in the Python venv to install Hugging Face Diffusers package and a few dependencies:
pip install diffusers
pip install transformers scipy ftfy accelerate
Install Visual Studio Code
To make life a bit easier for the Python coding lets install Visual Studio Code with the following commands:
wget -qO- https://packages.microsoft.com/keys/microsoft.asc | gpg --dearmor > packages.microsoft.gpg
sudo install -D -o root -g root -m 644 packages.microsoft.gpg /etc/apt/keyrings/packages.microsoft.gpg
sudo sh -c 'echo "deb [arch=amd64,arm64,armhf signed-by=/etc/apt/keyrings/packages.microsoft.gpg] https://packages.microsoft.com/repos/code stable main" > /etc/apt/sources.list.d/vscode.list'
sudo apt update
sudo apt install code
Install Visual Studio Code extensions
Lets start VSCode by running code command. There are two very useful extensions that should be installed after VSCode is launched:
- Python: E.g. provides auto-completion for Python code and other features.
- Jupyter: Provides basic notebook support for language kernels that are supported in Jupyter Notebooks today, and allows any Python environment to be used as a Jupyter kernel. According to the Jupyter Notebook documentation:
A computational notebook is a shareable document that combines computer code, plain language descriptions, data, rich visualizations like 3D models, charts, graphs and figures, and interactive controls. A notebook, along with an editor like Jupyter Notebook, provides a fast interactive environment for prototyping and explaining code, exploring and visualizing data, and sharing ideas with others.. At the end it allows you to type a few lines of Python code and execute it within VSCode. So you can develop your code step by step and see the result immediately.
Restart VSCode afterwards to have everything properly setup.
Develop first Jupyter Notebook
Click View and Command Palette.... Search for Create: New Jupyter Notebook. This will create a file called Untitled-1.ipynb. In the editor panel you can now start typing the code for the Stable Diffusion pipeline. E.g.:
import torch
from diffusers import StableDiffusionPipeline
pipe = StableDiffusionPipeline.from_pretrained(
  "runwayml/stable-diffusion-v1-5",
  torch_dtype=torch.float16)
pipe.to("cuda")
This can take a while. If that is done an example image can be created:
prompt = "a photorealistic airbus a380 plane flying in the air, background: blue sky with some white clouds"
image = pipe(
    prompt, num_inference_steps=30
).images[0]
image
In my case the image looks like this but your image will look quite different most probably:
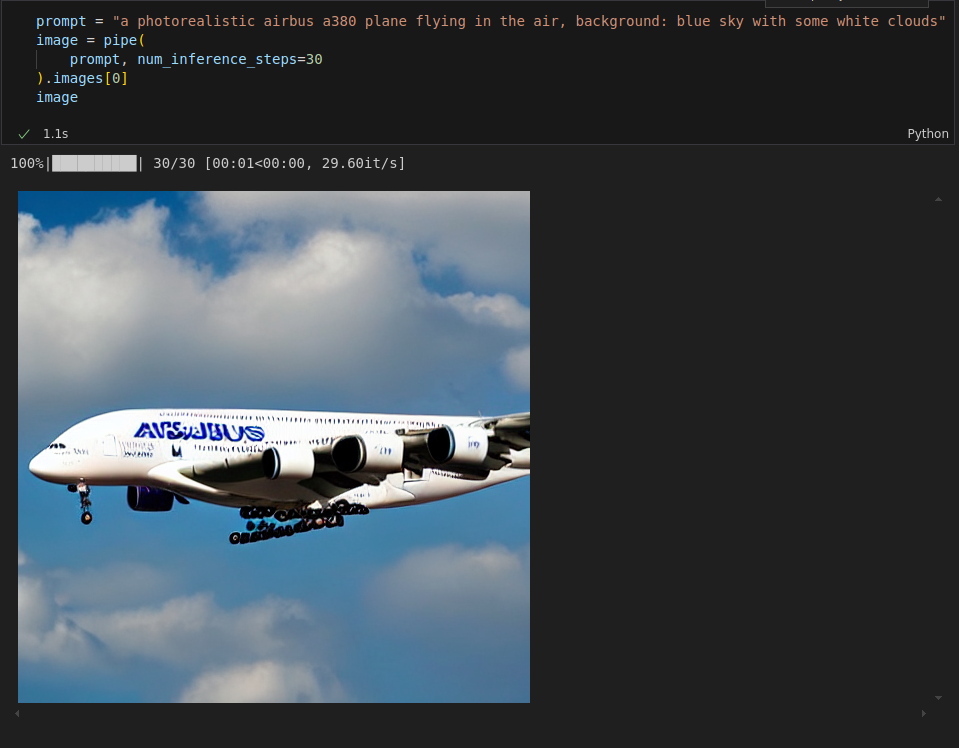
Not bad for the beginning but also not totally awesome 😉 But for now that’s it! Happy image creation!