Turn your computer into an AI machine - ComfyUI and FLUX.1-dev model

Introduction
In the previous part of this blog series I installed and configured ComfyUI for AI image generation. For image generation I was using JuggernautXL model as it gives good results pretty quickly and it fits into a GPUs VRAM with around 8-10 GByte.
But you might have heard about the FLUX.1-dev model (or FLUX.1-schnell). It’s creating really good images. And it also is able to add text to pictures (like some text on a sign) that actually matches your prompt 😉 Text in pictures is something other models normally struggle with. Also hands and fingers are normally looking good in contrast to Stable Diffusion models which sometimes struggle. The only problem at the beginning was that even a NVIDIA RTX 4090 with 24 GByte VRAM was hardly able to handle it because of it’s size.
Models size reduction: quantization
Luckily there is a FLUX.1-dev-gguf model. This is a quantized model of FLUX.1-dev. What does this mean? Quantization is a process used in AI to make models smaller without significantly losing their ability to perform tasks. AI models normally use “floating-point” numbers (like 32-bit or 64-bit numbers) to store things like weights (parameters) and activations. These are very precise but also use a lot of memory and computing power. Quantization reduces each weight or activation to a smaller, less precise number, such as an 8-bit number. This makes the model smaller and faster to run, especially on devices with limited resources like phones, laptops, or edge devices. A quantized GGUF model is like the “compressed and optimized” version of an original model that runs faster and takes up less space.
The GPT-Generated Unified Format (GGUF) is a standardized file format that simplifies the implementation and deployment of large language models, particularly optimized for inference models to run efficiently on standard consumer-grade computing devices. Since GGUF models are compressed it takes a bit longer to get a result using such a model.
If you read about inference in context of AI then it refers to the process of using a trained AI model to analyze live data and generate a prediction or solve a specific task. In this case it’s about writing some text about what an AI generated picture should contain, what it should look like, and so on with the result of getting a picture that contains what was requested.
Nevertheless even with those GGUF models a GPU with 8-12 GByte VRAM is more or less needed. 16-24 GByte are recommended.
With that little AI buzzword background lets see what GGUF files are at FLUX.1-dev-gguf - files and versions:
FLUX.1-dev files and versions
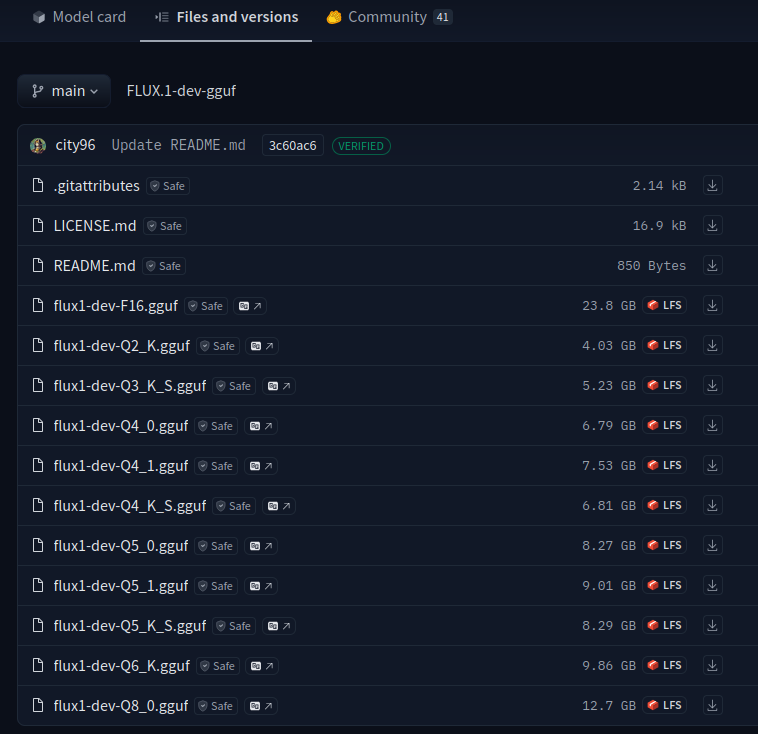
As you can see there are files ranging from Q2 to Q8 and one F16 file. The lower the number after Q the smaller (in size) the model is. In general the higher the number the better is the result but also more VRAM is needed. But the difference might be not that big actually between Q8 to Q6. But there is quite some difference between Q6 and Q2. It partly also depends on what image should be generated. So it’s also possible that even a model with half of the size can generate a very good result with not much visible difference to a bigger model. Also a general rule: The bigger (in size) the model is the better the result is most probably. But again it depends on how much VRAM you’ve.
With my 16 GByte VRAM I started to use the flux1-dev-Q8_0.gguf model. It’s 12.9 GByte. So should fit easily, right? Well, more or less… 😄 As you’ll see later it’s not only the model file that needs to be loaded. According to my observation I need around 14-15 GByte at the end with that model. And then you need some additional VRAM for various calculations. In my case only AI stuff runs on that graphics card as I use a different one for my desktop apps. But if you only have one graphics card then this one also has to handle the output of your desktop environment which also takes VRAM. At the end flux1-dev-Q8_0.gguf with t5-v1_1-xxl-encoder-Q8_0.gguf barely works. I can generate two images. But then the GPU runs out of VRAM. Luckily the model then gets unloaded and the next image generation loads the model again. And since the model is already in RAM it gets pretty quickly transferred into GPU’s VRAM. But if you want to generate a lot of images that makes no fun 😉 In this case you really see what it means to have a fast disk (like a WD Black NVMe) and a fast bus to transfer the data from disk to the GPUs VRAM 😉 But at least in this discussion you can see that there is basically no difference between the F16 (with nearly 24 GByte in size) and the Q8 one (with half of the size). And even Q6 is still good enough.
There is a nice graph of one community member which shows which models gives you the best cost-benefit. According to that graph it’s flux1-dev-Q6_K.gguf. That model has 9.86 GByte in size. So around 3 GByte less to the flux1-dev-Q8_0.gguf model. That model might fit a GPU with 12 GByte VRAM but I guess it wont make much fun.
Here is a discussion from a community user that created the same image for all K quants. That’s pretty interesting. Even the Q4 and Q3 result is still pretty good. If you’re lucky the flux1-dev-Q3_K_S.gguf model might fit into a GPU with 8 GByte of VRAM.
But now it’s time to install all the needed files.
FLUX.1-dev installation
To make FLUX work a few files need to be downloaded.
The ComfyUI workflow
FLUX needs a special workflow for ComfyUI. The one used in the previous chapter for JuggernautXL can’t be used. You can download the example workflow flux-1-dev-gguf-example.json by clicking on the following link with your right mouse button and choose Save Link As in the context menu. Just save it somewhere on your filesystem for now:
The GGUF model
Next the FLUX.1-dev model is needed (the one that will create your images according to your input). Choose the one that fits best for your your GPU on the FLUX.1-dev-gguf files and versions page. I already explained above what the file names are all about. But as a reminder: The bigger the number behind the Q the better are the results but the more VRAM you need. For my NVIDIA 4080 Super with 16 GByte VRAM I’ll choose flux1-dev-Q8_0.gguf. Put your file into $HOME/comfyui/models/unet/ directory.
t5-v1_1-xxl-encoder-gguf encoder model
Download one of the t5-v1_1-xxl-encoder-gguf files. Here the same applies as with the GGUF model above: The bigger the number behind the Q the better are the results but the more VRAM you need. In my case I’ll pick t5-v1_1-xxl-encoder-Q8_0.gguf but the Q6 and Q5 files should also deliver good results and are smaller. Put this file into $HOME/comfyui/ComfyUI/models/clip/ directory. From my understanding this model is used to encode the text input and potentially expand or redefine it to make it more accessible for the FLUX model.
clip_l.safetensors
Download clip_l.safetensors and put it into $HOME/comfyui/ComfyUI/models/clip/ directory.
flux_ae.safetensors
Download ae.safetensors and put it into $HOME/comfyui/ComfyUI/models/vae/ directory and rename it to flux_vae.safetensors.
Loading the flux-1-dev-gguf-example workflow
Now stop ComfyUI either using the shell and start it again with python main.py --listen or use ComfyUI-Manager to restart ComfyUI.
I’ve already downloaded flux-1-dev-gguf-example.json workflow above. Now I need to load that workflow file:
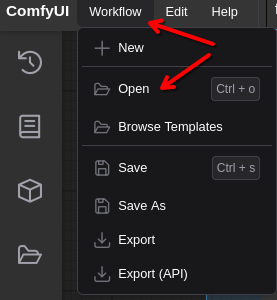
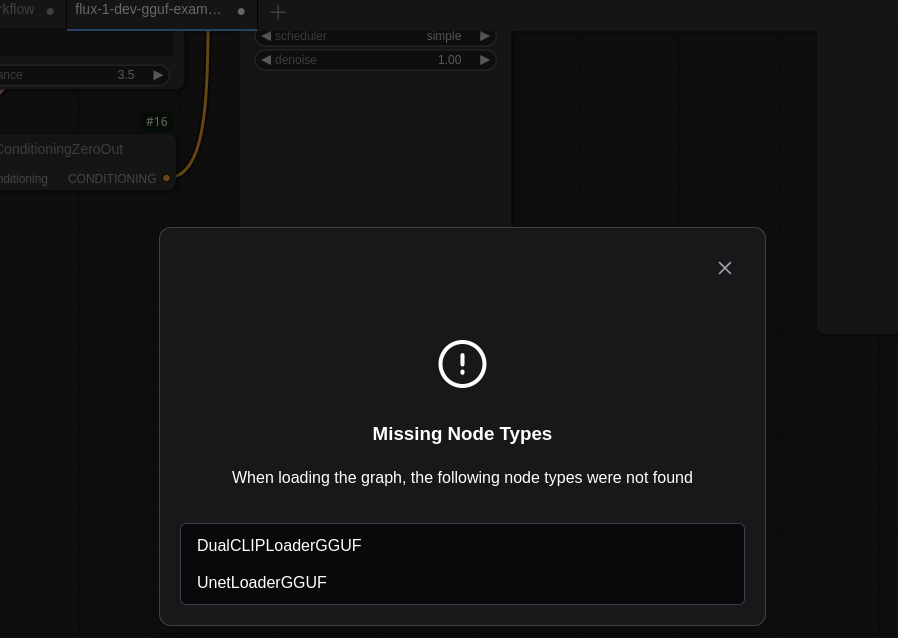
Click on Workflow in the menu on the upper left and the Open. Change to the directory you have stored flux-1-dev-gguf-example.json and open that file. This most probably will give you an error about missing nodes:
ComfyUI-GGUF plugin
So DualCLIPLoaderGGUF and UnetLoaderGGUF nodes are missing. They’re part of the ComfyUI-GGUF plugin. This is the kind of situation where again ComfyUI-Manager becomes very handy:
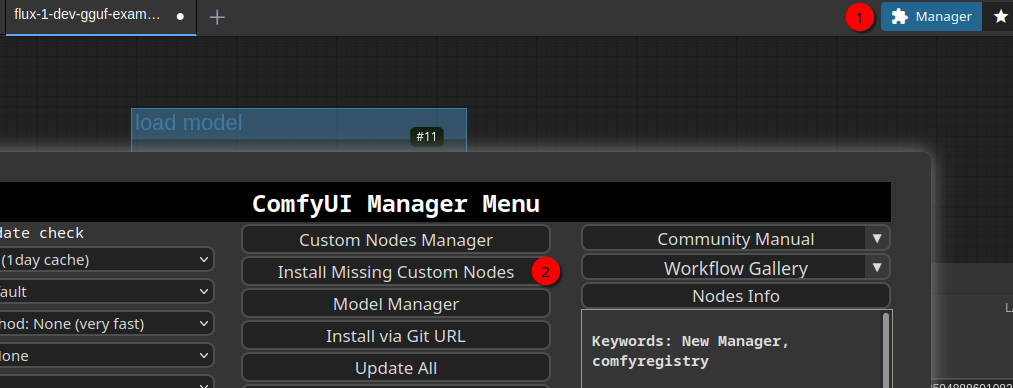
Open the Manager (1) and click on Install Missing Custom Nodes (2). This will show the following screen:

Now click Install and Restart as suggested. Once the the ComfyUI is reconnected click Back button and Close. Then reload the workflow page. Now everything should be in place and look similar to this (I’ve moved the nodes a bit already):
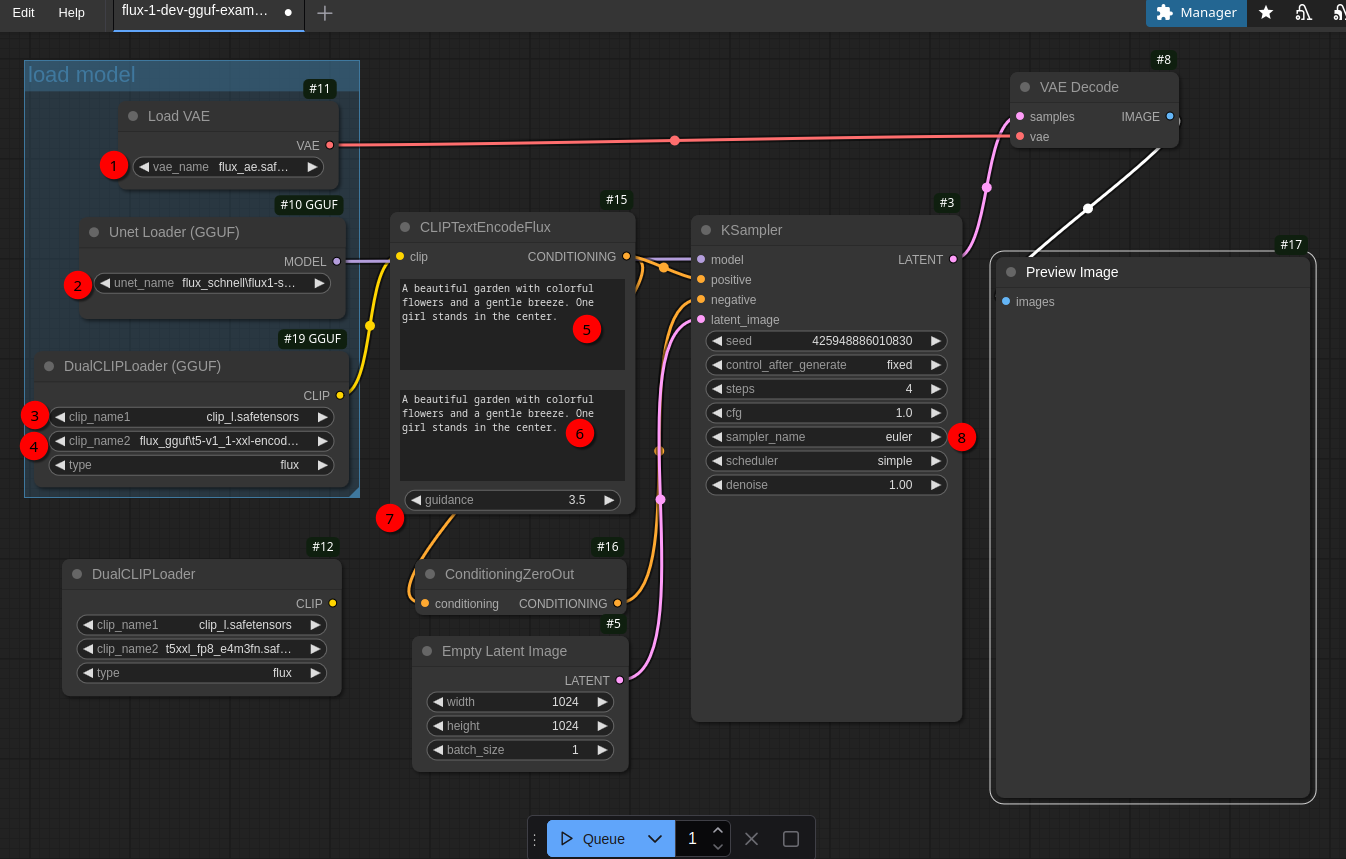
Creating the first images
Before the workflow can be used a few parameters need to be changed:
- 1 needs to be changed to
flux_vae.safetensors. - 2 needs to be changed to the model you downloaded (in my case
flux1-dev-Q8_0.gguf) - 3 should be fine already
- 4 needs to be changed to the model you downloaded (in my case
t5-v1_1-xxl-encoder-Q8_0.gguf)
The text fields are already prefilled. So just keep that for a moment. If you now click on Queue at the bottom the workflow should start creating an image. This will take a bit esp. the very first time when the models get loaded. If you execute nvidia-smi command a few times in the shell while the workflow is running you’ll see that the VRAM memory usage is constantly increasing. Depending which model you have chosen the final VRAM usage will be somewhere between 6-14 GByte. With the workflow, parameters and models above it’s around 13.4 GByte in my case:
+-----------------------------------------------------------------------------------------+
| NVIDIA-SMI 550.120                Driver Version: 550.120        CUDA Version: 12.4     |
|-----------------------------------------+------------------------+----------------------+
| GPU  Name                 Persistence-M | Bus-Id          Disp.A | Volatile Uncorr. ECC |
| Fan  Temp   Perf          Pwr:Usage/Cap |           Memory-Usage | GPU-Util  Compute M. |
|                                         |                        |               MIG M. |
|=========================================+========================+======================|
|   0  NVIDIA GeForce RTX 4080 ...    Off |   00000000:06:00.0 Off |                  N/A |
| 34%   35C    P8             14W /  320W |   13357MiB /  16376MiB |      0%      Default |
|                                         |                        |                  N/A |
+-----------------------------------------+------------------------+----------------------+

+-----------------------------------------------------------------------------------------+
| Processes:                                                                              |
|  GPU   GI   CI        PID   Type   Process name                              GPU Memory |
|        ID   ID                                                               Usage      |
|=========================================================================================|
|    0   N/A  N/A   1780068      C   /home/user/comfyui/bin/python               11302MiB |
+-----------------------------------------------------------------------------------------+Hint: If you get a popup window while creating various images over time with the warning CLIPTextEncodeFlux - Allocation on device then just click it away and start the image generation again. That normally works fine. Only the model gets “unloaded” from GPU’s VRAM and needs to be loaded again by ComfyUI. But that works pretty fast. But in this case you should think about using smaller models.
The result in my case looked like this:

Not bad but pretty blurry. The reason for that is that the Steps in KSampler node is only 4. For FLUX.1-dev it needs to be at least 20. So after changing that parameter the image looks like this:

That’s way better 😄 Another important parameter is Guidance in the CLIPTextEncodeFlux node. It tells the model how close it should follow the prompt. E.g. if I use the prompt
A dragon and a unicorn in a mystery forest surrounded by three witches.
with a Guidance value of 2 I get this picture:

(I know the dragon looks more like a unicorn 😄) With a Guidance of 4 I get this:

The general guideline is like this: For relatively short prompts and requirements, setting the Guidance to 4 may be a good choice. However, if your prompt is longer or you want more creative content, setting the guidance between 1.0 and 1.5 might be a better option (while 1.0 produced some weird images for me 😉 2.0 resulted in better images.):
- Higher values result in images that more closely match the prompt but may lack some creativity.
- Lower values result in images that are less closely matched to the prompt but may be more creative.
Another nice parameter is batch_size in Empty Latent Image. It specifies how much variations of an image should be created. So you’ll get similar images if it comes to style but they all look differently. Remember that this - again - costs VRAM resources and als increases processing time. So if you already near your VRAM limit you might not be able to use something > 1 (but of course you can use a smaller model).
Create images from a image description generated by Llama 3.2-vision:11b
In the two previous blog posts (1 and 2) I asked the Llama 3.2-vision:11b model to describe what’s on a book cover I provided. The answer was like this:
The picture features a number of blue spheres floating above water or another reflective surface, with some spheres casting shadows onto the surface below.
The largest sphere is centered and sits atop what appears to be a dark reflection that extends outward from its base, resembling a shadow. It reflects light in various directions, creating different shades of blue across its surface.
Surrounding this are four smaller spheres, arranged in a square formation with one in each corner. Each one casts a shadow onto the reflective surface below and also reflects light in various directions.
The image is framed by an off-white border that adds some contrast to the rest of the picture. The background color is a medium blue.
So after DALL-E and Juggernaut XL lets see what FLUX.1-dev creates. For this test I used the prompt a bit differently. In the CLIPTextEncodeFlux node in the upper textbox I put this prompt: Cineastic movie style, ultra realistic, 3d. In the textbox below the text I mentioned above.
For the first picture I used a guidance of 2:
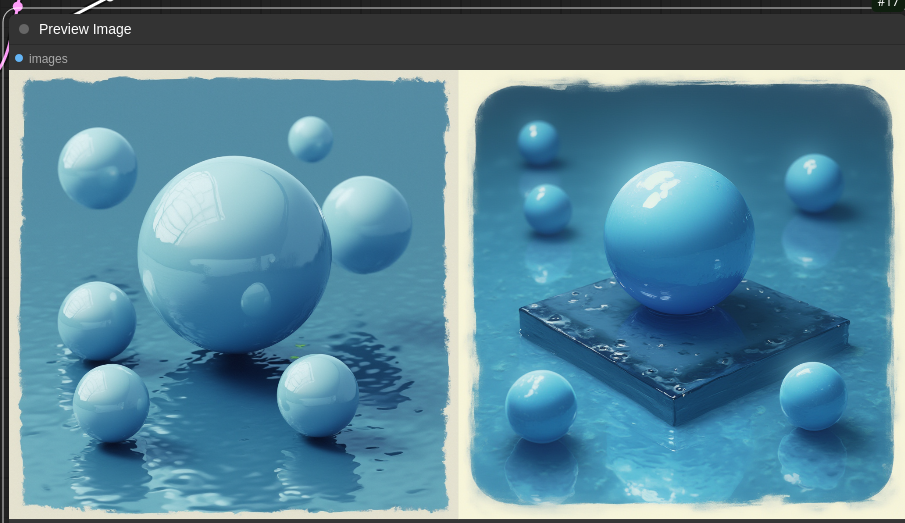
The next picture was created with a guidance of 3:
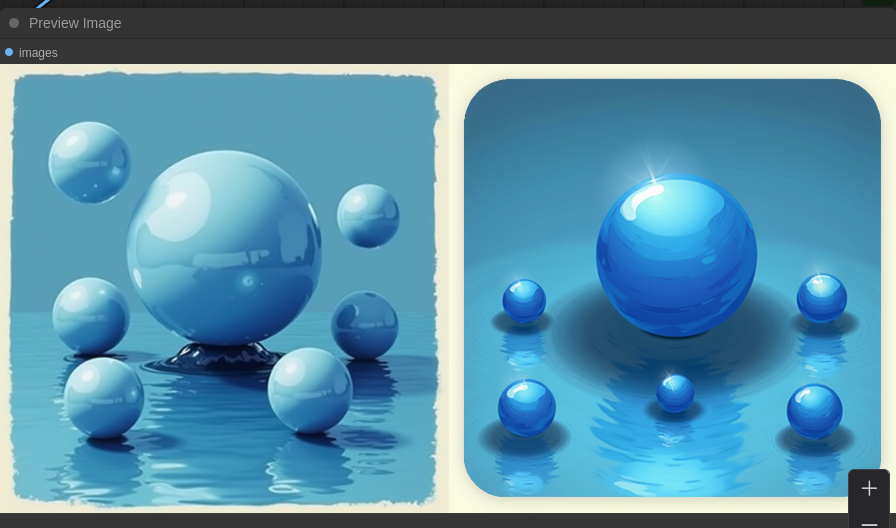
Pretty good! Both look like ray traced pictures and they come the book cover pretty close!
Next I wanted to know about the difference using the current Q8 model and the Q6 model (using flux1-dev-Q6_K.gguf in unet_name in Unet Loader (GGUF) node and t5-v1_1-xxl-encoder-Q6_K.gguf in clip_name2 in DualCLIPLoader (GGUF) node) - again guidance set to 2:
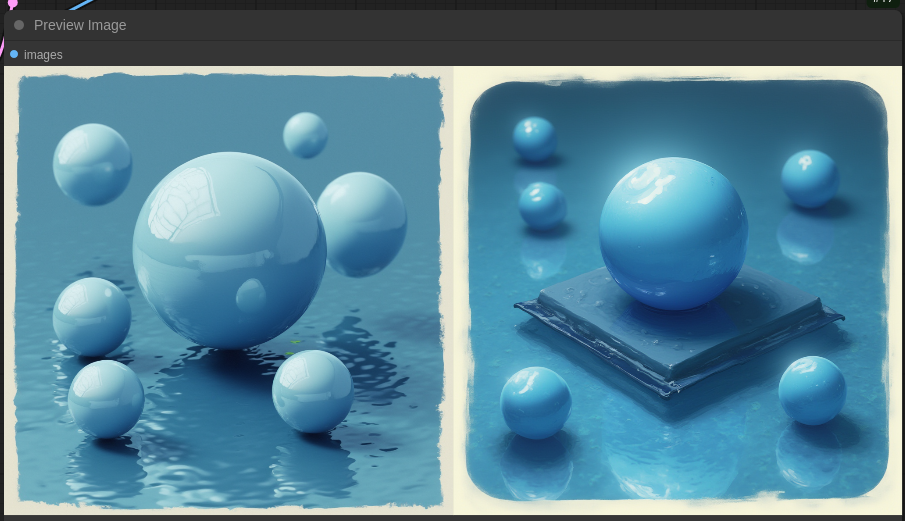
During image creation the VRAM usage was at around 11.1 GByte. So it’s about 2.5 GByte lower than with the Q8 model. The first image looks pretty much the same but the second looks a bit different. So maybe it makes sense to use a smaller model while experimenting and change to a bigger once satisfied with the prompt to render the final image.
Now what about text? I’ve heard FLUX is especially great if it comes putting some text into an image. So I tried this prompt:
A hedgehog holding a sign in this hand with the text “Hi there!” in a beautiful garden with lots of flowers and other animals.
And here is what I got:
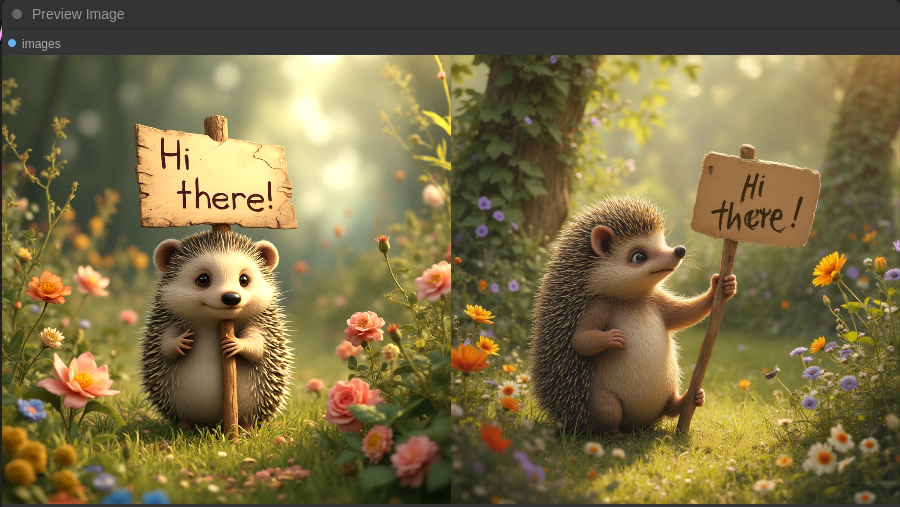
Well, the hedgehog on the first picture is most probably dead 😄 But the second looks really nice - besides the fact that there are no “other animals” as I requested 😉 So one last try with a little bit different prompt:
A hedgehog holding a sign in this hand with the text “Hi there!” in a beautiful garden with lots of flowers. There should be also some little birds around.
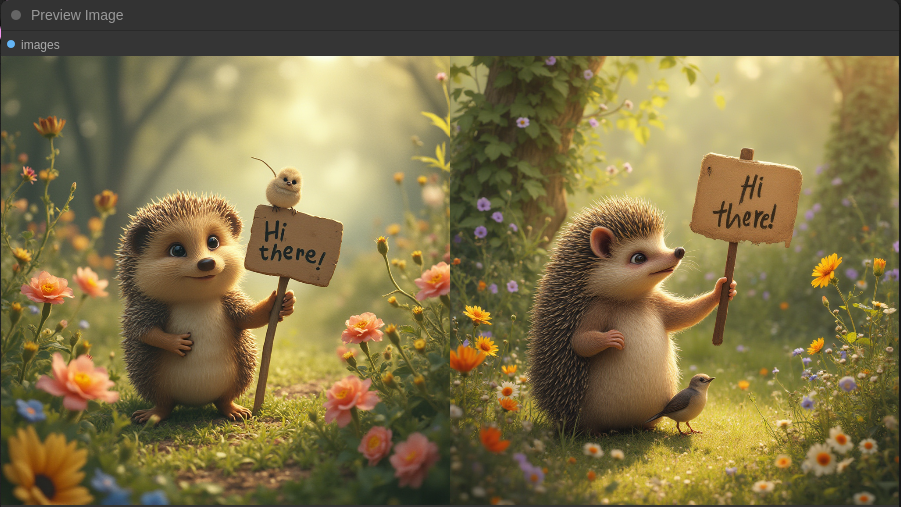
Ok, at least one bird 😄
At the end one final thing: You can also play around with control_after_generate and set it to randomize. This will change the number in seed after every image generation and creates images that are more different than setting control_after_generate to fixed which is what I used so far. fixed is a good setting if your prompt is already quite good but you only want to change nuances.
That’s it for today. Happy image creation! The next blog post is about AI videos with ComfyUI and HunyuanVideo model.