Turn your computer into an AI machine - ComfyUI: private and locally hosted AI image generation

Introduction
If you followed my blog series so far you’ve everything setup to install ComfyUI which I use for local AI image generation without the need for any external services. There are a lot more tools out there to do this and some are also a little bit easier to use. But ComfyUI is really quite powerful and one can integrate it into Open WebUI to generate images completely locally without using external AI tools like DALL-E from OpenAI. Maximum privacy and flexibility 😄
With the previous blog posts all prerequisites already installed to start with ComfyUI. But here is a list of things that need to be installed to be able to work with ComfyUI:
- Install Ubuntu 24.04
- Install NVIDIA drivers
- Install NVIDIA CUDA toolkit
- Install NVIDIA utils
- Install git utility
- Install uv utility
- Install and use direnv utility
Install ComfyUI
As of writing this blog post Python 3.12 is recommended to be used with ComfyUI. As usual lets install a Python virtual environment with Python 3.12 using uv utility (again --seed also installs tools like pip e.g.):
uv venv --python 3.12 --seed comfyuiChange to newly created directory:
cd comfyuiUsing direnv
direnv is a little utility that can run various commands when you enter a directory. So instead of running source bin/activate all the time to activate the ComfyUI venv, I’ve added a file called .envrc into the comfyui directory with the following content:
source ./bin/activateNext install direnv:
sudo apt install direnvAdditionally there needs to be a hook added to $HOME/.bashrc to make direnv work:
eval "$(direnv hook bash)"To get it enabled immediately:
source $HOME/.bashrcThe next time you enter /home/your-user/comfyui directory you get an error as you need to allow direnv to load the .envrc file in this directory. E.g.:
direnv allow .If you now leave the directory and re-enter again the commands in .envrc will be executed. In this case it means that the Python venv gets activated and python and pip executables of that venv will be used.
Clone ComfyUI Git repository
While still in $HOME/comfyui directory clone the ComfyUI Git repository. E.g.:
git clone https://github.com/comfyanonymous/ComfyUIThen switch to cloned ComfyUI directory:
cd $HOME/comfyui/ComfyUIInstall PyTorch
Next PyTorch is needed. Three Python libraries needed for this:
pip install torch torchvision torchaudio --extra-index-url https://download.pytorch.org/whl/cu124This will take some time depending on your Internet connection speed as quite some big files will be downloaded. If that is done further Python libraries need to be downloaded:
pip install -r requirements.txtStart ComfyUI
Now with everything installed ComfyUI can be started:
python main.py --listenComfyUI listens on port 8188 by default. So if you have everything running locally you should now be able to enter http://127.0.0.1:8188 in your browser URL bar and the ComfyUI UI should become visible.
Using ComfyUI
By default there is already a workflow loaded. But since there are no models and whatsoever installed, not much can be done with that default workflow.
Downloading and install JuggernautXL model
One of the most important things needed is a large language model (LLM) which is able to “transform” the text input into an image. One of the most important sites to download models is Civitai. And one of the models to start with is JuggernautXL. This model normally creates good images right from the start without too much tuning. And it needs about 7 GByte of VRAM. So even with a graphics card with around 8 GByte of video RAM this model might still fit into memory. For my NVIDIA RTX 4080 SUPER with 16 GByte of VRAM it’s definitely no issue. But remember that the model needs to be loaded into VRAM before the very first image can be created. This can take a bit to transfer around 7 GByte of data from the hard disk to the graphic cards VRAM.
You can also find other SDXL (Stable Diffusion XL) models on Civitai. Stable Diffusion is a type of generative model that uses diffusion processes to create images, and it is widely used in the AI community for various applications such as art generation, design, and more. SDXL is a more advanced version of former iterations of Stable Diffusion models. To find such models goto Civitai, click Models (1) and then on Filters (2) on the top right:
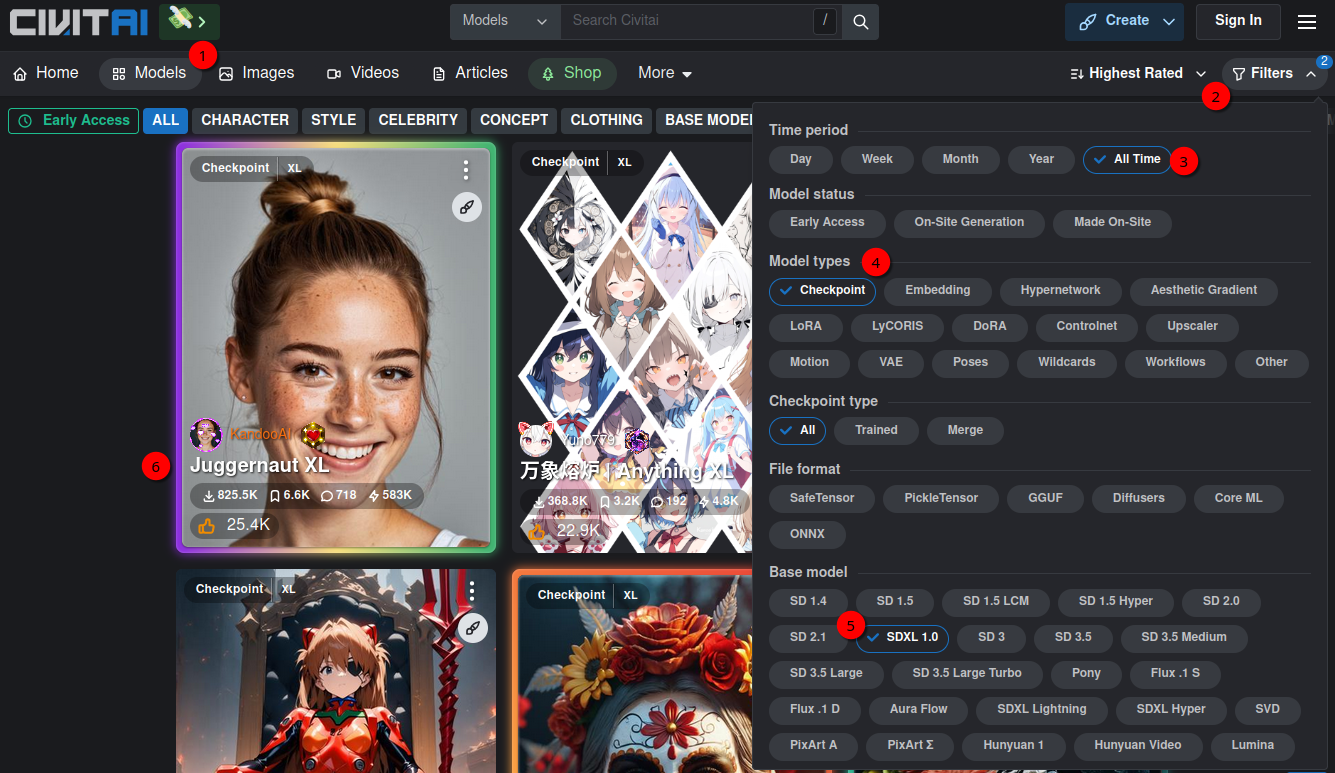
Then click All Time (3) for the Time period and Checkpoint (4) for Model types. In Base mode click on SDXL 1.0 (5). As mentioned above already for now select JuggernautXL model. We need to download that model:
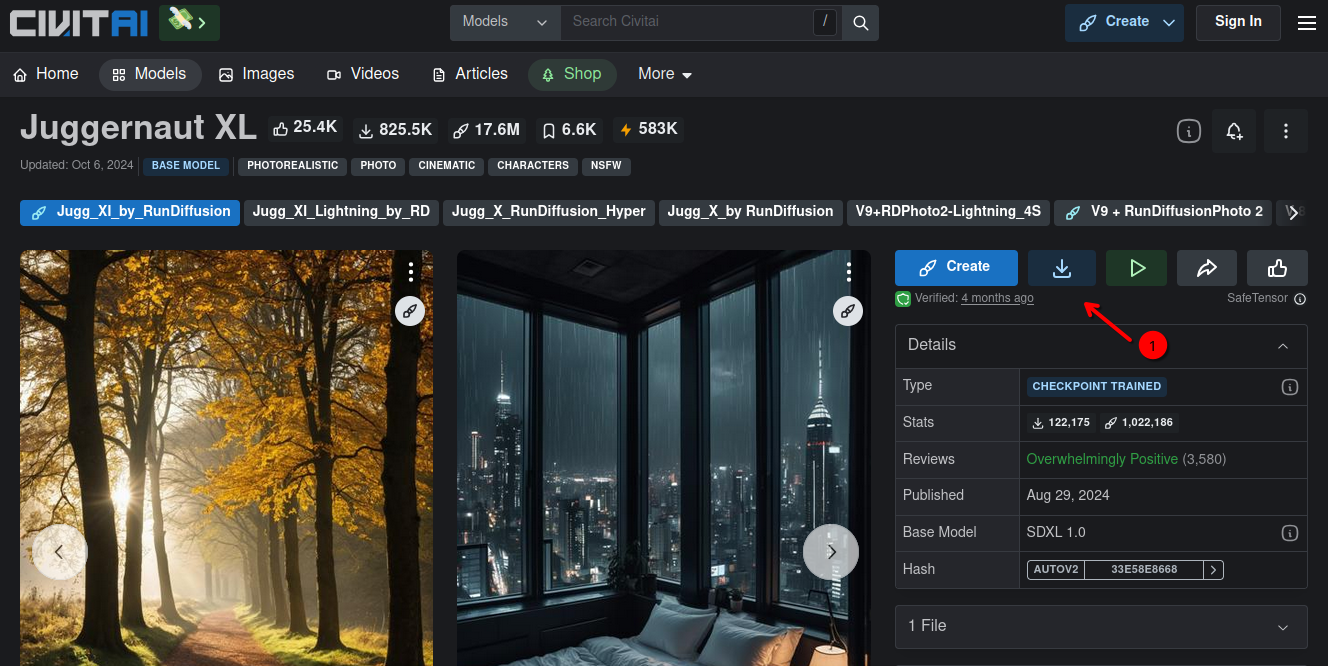
Click on the download button (1). The file is called juggernautXL_juggXIByRundiffusion.safetensors. This file needs to be stored in comfyui/ComfyUI/models/checkpoints folder. As mentioned above this file is around 7 GByte. So depending on your Internet connection this might take a bit.
Generating first AI image
Once the model was downloaded ComfyUI needs to be restarted. As I started ComfyUI via a shell command above I go back to the terminal and press CTRL+C to stop the Python process. Then start it again:
python main.py --listenThen lets go back to the browser to http://127.0.0.1:8188/ and reload the website. With the default workflow still loaded I can now choose the juggernautXL_juggXIByRundiffusion checkpoint in Load Checkpoint (1) node:
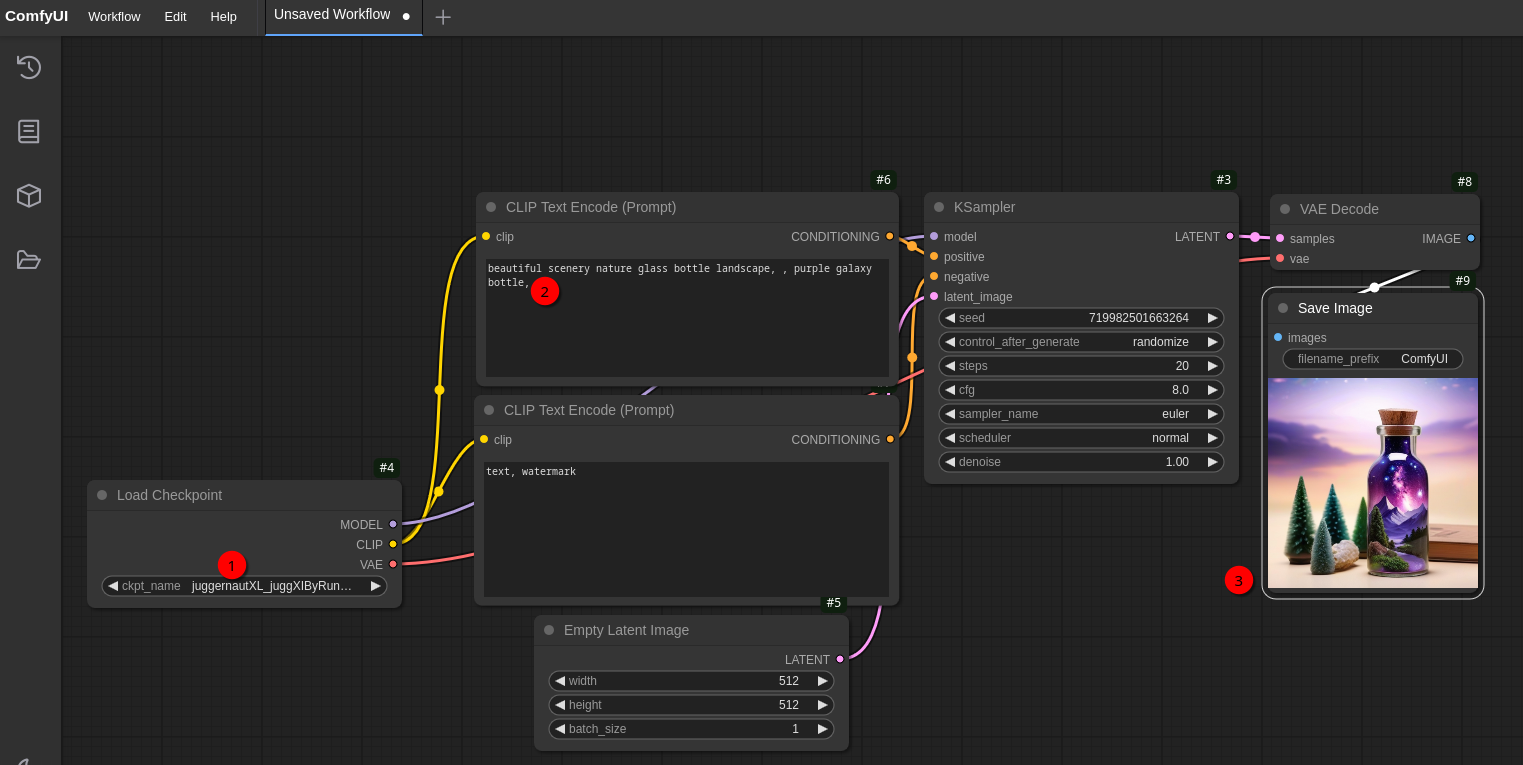
There should be also some text prefilled in CLIP Text Encode (Prompt) (2) which I just keep as is. This text node contains the text that describes what picture the model should generate. The node below which is also called CLIP Text Encode (Prompt) is the so called “negative prompt”. Here you can include text about things and objects you don’t want to have in the resulting image. Hint: For the Juggernaut XL models normally no negative prompt should be used at the very beginning.
I wont get too much into the details of a workflow right now to have some quick results. I’ll get into more details with another blog post. So without further explanation about the whole workflow just click Queue button on the bottom. If your graphic card fans are now starting to make noise you’re doing everything right 😄 After a few seconds you should see a similar image (3) like the one in the screenshot above. Congratulations! You just created your first AI image 😉
Now I wanna know how much VRAM the model needs. While the image is generated I can execute nvidia-smi command in a terminal window:
Mon Jan  6 19:49:42 2025
+-----------------------------------------------------------------------------------------+
| NVIDIA-SMI 550.120                Driver Version: 550.120        CUDA Version: 12.4     |
|-----------------------------------------+------------------------+----------------------+
| GPU  Name                 Persistence-M | Bus-Id          Disp.A | Volatile Uncorr. ECC |
| Fan  Temp   Perf          Pwr:Usage/Cap |           Memory-Usage | GPU-Util  Compute M. |
|                                         |                        |               MIG M. |
|=========================================+========================+======================|
|   0  NVIDIA GeForce RTX 4080 ...    Off |   00000000:06:00.0 Off |                  N/A |
|  0%   42C    P2             43W /  320W |    6995MiB /  16376MiB |      0%      Default |
|                                         |                        |                  N/A |
+-----------------------------------------+------------------------+----------------------+

+-----------------------------------------------------------------------------------------+
| Processes:                                                                              |
|  GPU   GI   CI        PID   Type   Process name                              GPU Memory |
|        ID   ID                                                               Usage      |
|=========================================================================================|
|    0   N/A  N/A   2696161      C   python                                       6988MiB |
+-----------------------------------------------------------------------------------------+
As you can see the model needs around 7 GByte VRAM (6995 MiB). That’s pretty much the same size it uses on disk. That also means that I’d be able to load another model with around 8-9 GByte. That becomes important later when I want to combine ComfyUI and Open WebUI because for ComfyUI I need a different model to generate images while Open WebUI needs a model loaded to generate text. To get max. speed I need both models loaded into VRAM at the same time if I want to generate images while working with Open WebUI.
Here is an example that has Juggernaut XL XI model loaded for ComfyUI and Llama 3.1 8b for Open WebUI`:
+-----------------------------------------------------------------------------------------+
| NVIDIA-SMI 550.120                Driver Version: 550.120        CUDA Version: 12.4     |
|-----------------------------------------+------------------------+----------------------+
| GPU  Name                 Persistence-M | Bus-Id          Disp.A | Volatile Uncorr. ECC |
| Fan  Temp   Perf          Pwr:Usage/Cap |           Memory-Usage | GPU-Util  Compute M. |
|                                         |                        |               MIG M. |
|=========================================+========================+======================|
|   0  NVIDIA GeForce RTX 4080 ...    Off |   00000000:06:00.0 Off |                  N/A |
| 34%   41C    P8             13W /  320W |   13342MiB /  16376MiB |      0%      Default |
|                                         |                        |                  N/A |
+-----------------------------------------+------------------------+----------------------+

+-----------------------------------------------------------------------------------------+
| Processes:                                                                              |
|  GPU   GI   CI        PID   Type   Process name                              GPU Memory |
|        ID   ID                                                               Usage      |
|=========================================================================================|
|    0   N/A  N/A   1770578      C   ...unners/cuda_v12/ollama_llama_server       6310MiB |
|    0   N/A  N/A   3510564      C   /home/user/comfyui/bin/python                7022MiB |
+-----------------------------------------------------------------------------------------+
As you can see above around 13 GByte out of 16 GByte VRAM are now used when the models mentioned above are loaded.
Extending ComfyUI and some tips
There are quite a few extensions, additional nodes, and so on that makes life easier with ComfyUI. So before getting a bit more into detail what the components of the workflow used above is all about, lets extend ComfyUI a bit.
ComfyUI-Manager
ComfyUI-Manager is a must-have. The “Restart” button alone is worth it because that’s something you need to do with ComfyUI pretty often at the beginning when installing new stuff 😉 But besides that it’s an extension designed to enhance the usability of ComfyUI. It offers management functions to install, remove, disable, and enable various custom nodes of ComfyUI. Furthermore, this extension provides a hub feature and convenience functions to access a wide range of information within ComfyUI. It allows to downloading new models and and also updating ComfyUI. So by using the ComfyUI-Manager you don’t need to use pip install -U ... in the shell anymore to update ComfyUI.
To install ComfyUI-Manager:
- Switch to
$HOME/comfyui/ComfyUI/custom_nodesdirectory - Execute
git clone https://github.com/ltdrdata/ComfyUI-Manager comfyui-manager - Restart
ComfyUI(as above withCTRL+Cin the terminal and starting it again withpython main.py --listen) - Back in the browser hit
SHIFT+Reloadbutton to reload theComfyUIpage.
Now you should see the Manager button (1) at the top right. Click on that one and you should see something similar to that:
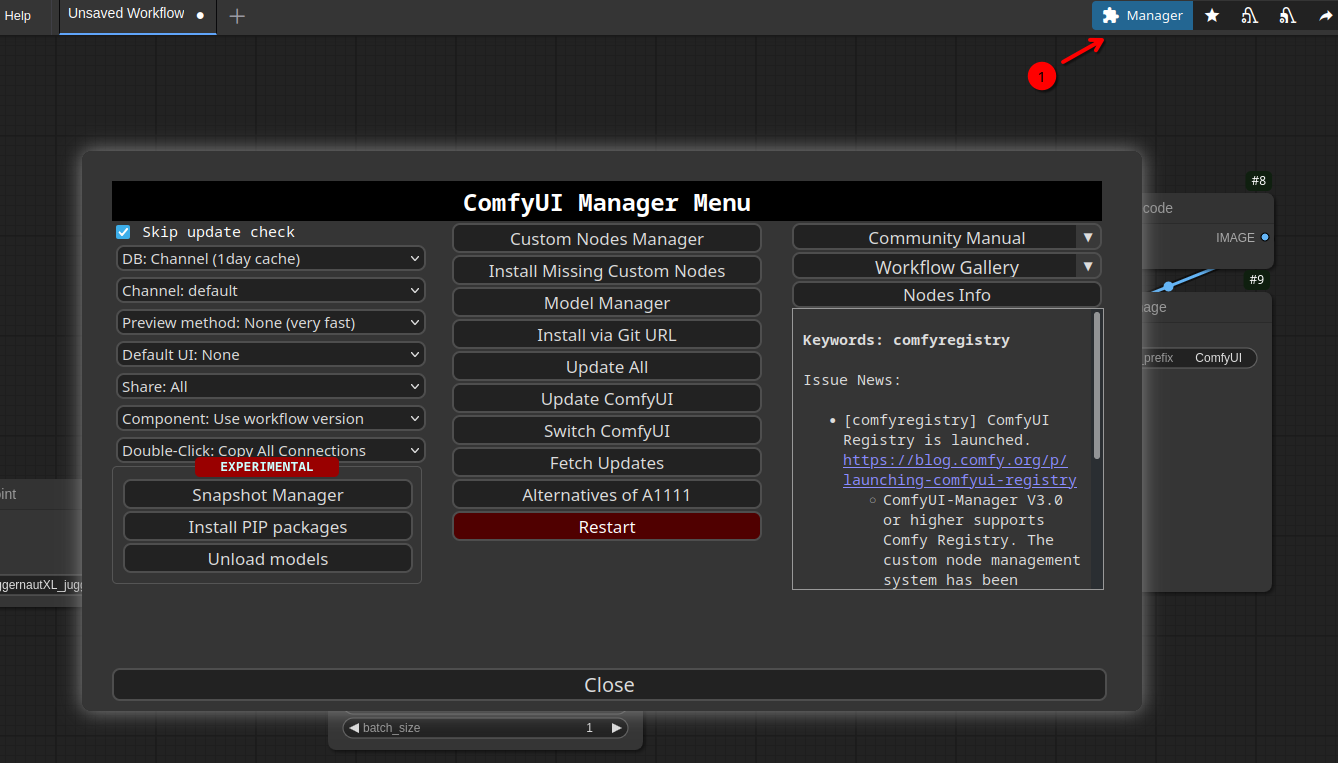
Now every time if a restart is needed (e.g. if a new model got installed), just open the ComfyUI-Manager and press the Restart button.
A better workflow
The default workflow I used above is nice but there are better ones out there. One site that offers ComfyUI Workflows is OpenArt. Lets search for Juggernaut workflows. Lets choose the Workflow 1 (Readhead - Juggernaut XI) workflow. While the preview picture of that workflow shows a womans head with red hair, this workflow can do way more without needing a lot more additional resources. So lets download that workflow by clicking the Download button on the top right of the workflow webpage. Store the file workflow-workflow-1-readhead---juggernaut-xi-yHLfPilJlBaGxPlHOluD-seal_harmful_40-openart.ai.json somewhere. Now switch to ComfyUI tab in your browser to load the workflow:
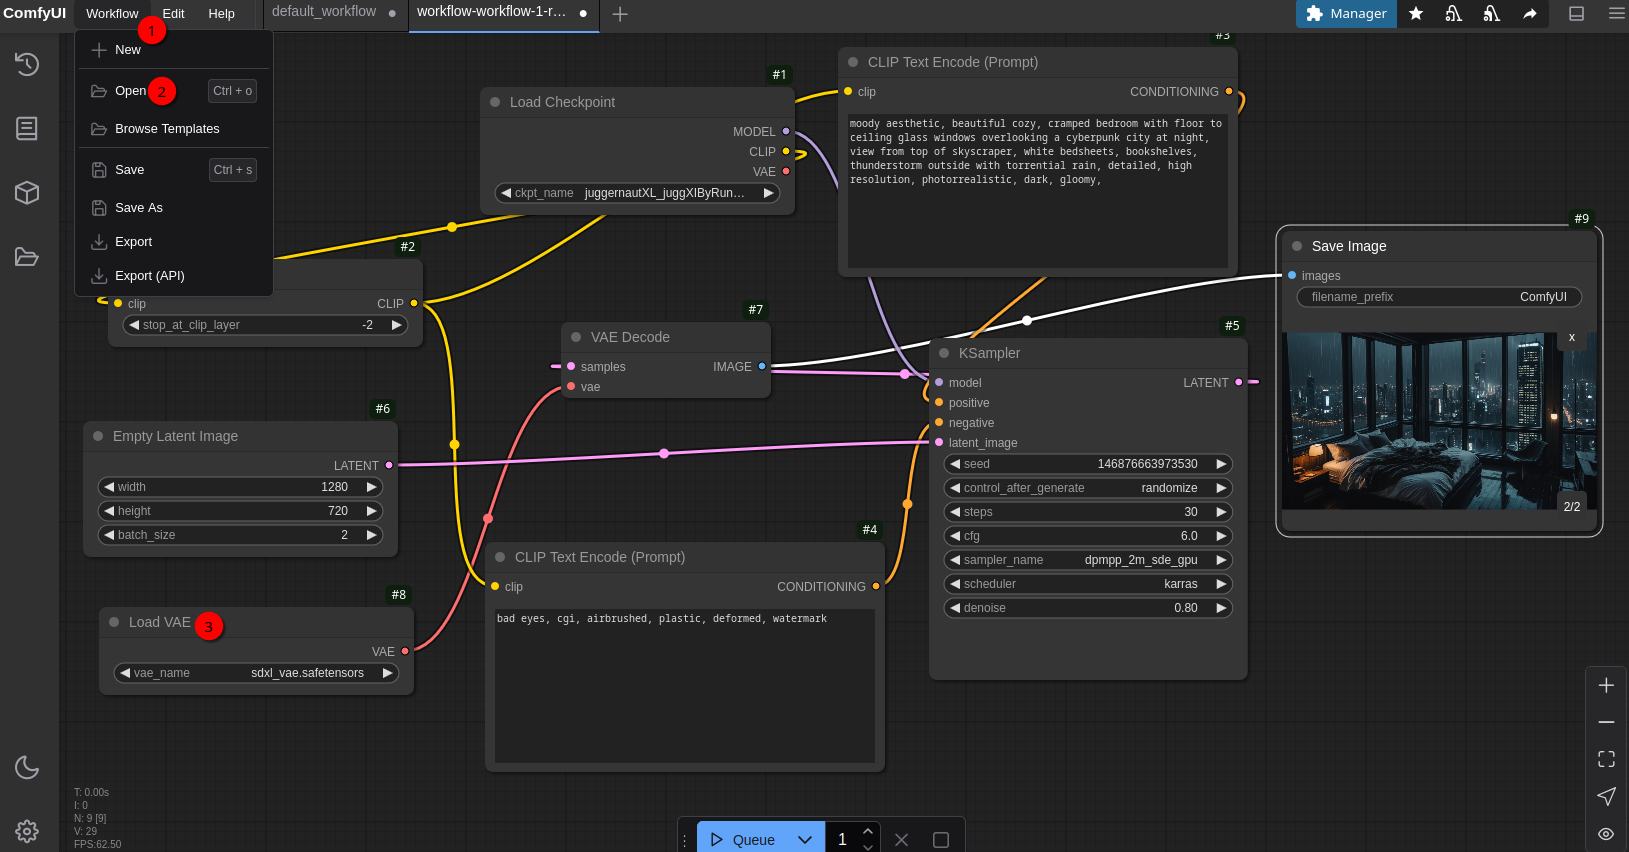
Click on Workflow (1) in the top left, then Open (2) and select the workflow file just downloaded. If you now click on the Queue button to generate an image you’ll get an error stating that sdxl_vae.safetensors is missing. Those .safetensors files can be easily found by just pasting the file name into Google search. In nearly all cases you’ll end up at Hugging Face which means stabilityai/sdxl-vae in this case. There you can download that file. It’s about 335 MByte. In this case the sdxl_vae.safetensors file has to be stored in $HOME/comfyui/ComfyUI/models/vae directory. So put it there and use ComfyUI-Manger to restart ComfyUI. If you now click Queue button again it will take a few seconds and now the image generation should work.
Creating good prompts
With that basic workflow you can do already quite a lot and the images are looking quite impressive even without much effort. To create good prompts for good looking images using Juggernaut XI or XII model please read Prompt Guide for Juggernaut XI and XII by RunDiffusion.
Also if you have a look at the Juggernaut XL - Jugg_XI_by_RunDiffusion model page at Civitai and scroll down a bit you see a lot of images created with that model. Quite often if you click on an image you get the prompts and parameters used by the image creator. These prompts and parameters are also good starting points for creating your own images at the beginning. Sometimes it can be really frustrating. You think you have a good positive and negative prompt but the result looks not very good at the end. Sometimes it’s just a single keyword that destroys your image. So by looking at the example pictures and parameters used you can get a “feeling” what works and what not over time.
For the workflow above I used the prompt of this image. On the right side of the image page there you can see what prompts were used and also some parameters. So for the current workflow I used basically the same settings:
Positive prompt (CLIP Text Encode (Prompt) - the one on the top of the page):
moody aesthetic, beautiful cozy, cramped bedroom with floor
to ceiling glass windows overlooking a cyberpunk city at night,
view from top of skyscraper, white bedsheets, bookshelves,
thunderstorm outside with torrential rain, detailed,
high resolution, photorrealistic, dark, gloomy
Negative prompt (CLIP Text Encode (Prompt)):
bad eyes, cgi, airbrushed, plastic, deformed, watermarkFor KSampler the following parameter were used:
Steps:30Sampler:dpmpp_2m_sde_gpu
In Empty Latent Image node you can specify the width and the height of the generated images. According to the Juggernaut prompt guide mentioned above the best image sizes are: 1024x1024, 832x1216 and 1216x832. So if you get bad results that might be an option to try different image sizes. You can also specify batch_size. This tells the generator how many images should be created. With 4 you get four different images that all are aligned to the text prompt. 4 is a good number to start with but it also takes longer to generate the images with a higher count here of course. But esp. when creating images with humans only one or two of the generated images are somewhat useable - at least that was the case for me but with a very good prompt even four images might look good 😉. Also if you run out of VRAM reducing the amount of pictures created might help.
With the parameters and prompts above I get images like this:

Not bad for an AI noob 😄
Create images from a image description generated by Llama 3.2-vision:11b
In one of my previous blog posts I asked the Llama 3.2-vision:11b model to describe what’s on a book cover I provided. The answer was like this:
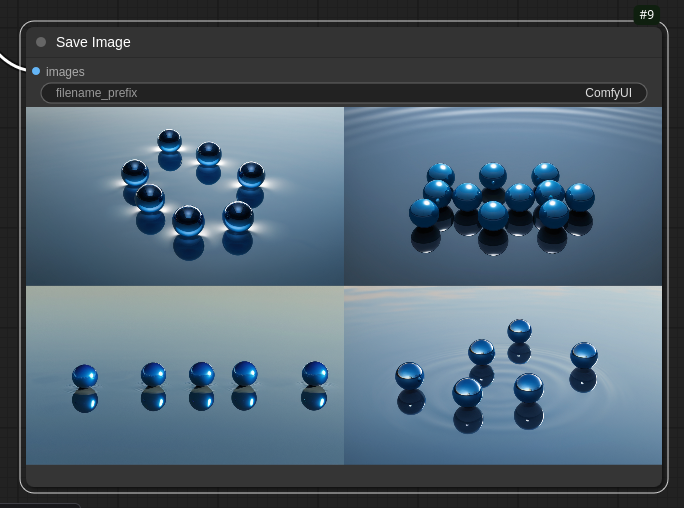
The picture features a number of blue spheres floating above water or another reflective surface, with some spheres casting shadows onto the surface below.
The largest sphere is centered and sits atop what appears to be a dark reflection that extends outward from its base, resembling a shadow. It reflects light in various directions, creating different shades of blue across its surface.
Surrounding this are four smaller spheres, arranged in a square formation with one in each corner. Each one casts a shadow onto the reflective surface below and also reflects light in various directions.
The image is framed by an off-white border that adds some contrast to the rest of the picture. The background color is a medium blue.
At that time I used that prompt to ask DALL-E from OpenAI to generate an image out of that description. That result was quite good but every image generation with DALL-E costs money of course (but actually it’s not that much if you don’t create thousand of images…). So what image will my basic ComfyUI workflow with Juggernaut XL model will create? Well, it was somewhat ok’ish:
That’s it for today. The next blog post will get a bit deeper into ComfyUI workflows and try to use the FLUX.1-dev model that everybody is talking about since it was introduced a few month ago. While the original one hardly fits into the VRAM of a RTX 4090 with 24 GByte VRAM there are some quantized models that can be used with GPUs with less VRAM.